
Certainly! Get instant access to the manual—click here for details……
- The Walkaround: Case 580N Super N Wide Track Backhoe | Eagle Power & Equipment Eagle Power PSSR Emeritus Tom Kelly Takes Us On An In-Depth Walkaround of The CASE 580 Super N Wide Track Backhoe.
Cleaning the fuel injectors on a case 580N, 580SN, 580SN WT, or 590SN Tier 4 Backhoe Loader is an important maintenance task to ensure optimal engine performance and efficiency. Fuel injectors help deliver the right amount of fuel into the engine for combustion, and If they become clogged or dirty, it can lead to poor engine performance, increased emissions, and reduced fuel efficiency. Here’s a step-by-step guide on how to clean the fuel injectors:
### tools and Materials Needed:
1. **Basic Hand Tools**: Wrenches, sockets, screwdrivers, pliers.
2. **Fuel Injector Cleaner**: You can use a commercial fuel injector cleaning kit or a solvent specifically designed for cleaning injectors.
3. **Compressed Air**: For drying and blowing out passages.
4. **Safety Gear**: Gloves, safety glasses, and possibly a mask.
5. **Shop Towels/Rags**: For cleaning spills and wiping parts.
6. **New Fuel Injector O-rings**: It’s a good idea to replace these when cleaning.
### Steps to Clean Fuel Injectors:
#### 1. **Safety First**
– Ensure the backhoe is parked on a flat surface and the engine is off.
– Engage the parking brake and disconnect the battery to avoid any electrical issues.
– Wear safety gear to protect yourself from fuel and chemicals.
#### 2. **Locate the Fuel Injectors**
– Open the engine compartment. The fuel injectors are usually located on the engine’s intake manifold.
– Refer to the operator’s manual for specific locations and diagrams to help identify the injectors.
#### 3. **Remove the Engine Cover**
– If necessary, remove any engine covers that obstruct access to the fuel injectors. Use the appropriate tools to do this.
#### 4. **Disconnect Fuel Lines**
– Carefully disconnect the fuel lines from the injectors. Fuel may spill, so have a rag handy to catch any drips. Be cautious as this can be pressurized.
– Depending on the design, you may need a special tool to release the fuel lines.
#### 5. **Disconnect Electrical Connectors**
– Each fuel injector will have an electrical connector. Gently disconnect these connectors by pressing the release tab and pulling them off.
#### 6. **Remove the Fuel Injectors**
– Using the correct socket or wrench, remove the bolts or clips holding the injectors in place. Carefully pull the injectors out of their seats.
– Inspect the O-rings on the injectors. If they look worn or damaged, replace them with new ones.
#### 7. **Clean the Injectors**
– If using a commercial injector cleaning kit, follow the manufacturer’s instructions. Typically, you’ll attach the cleaner to the fuel rail where the injectors were located.
– If cleaning by hand, use a soft brush and the injector cleaner to remove deposits from the injector nozzles. Be gentle to avoid damaging the injector.
#### 8. **Use Compressed Air**
– After cleaning, use compressed air to blow out any remaining cleaner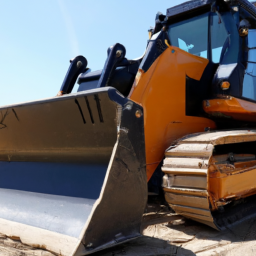 and debris from the injectors. This ensures they are free of contaminants.
#### 9. **Reinstall the Injectors**
– Place new O-rings on the injectors (if replaced) and carefully insert the injectors back into their seats.
– Secure them with the bolts or clips you removed earlier.
#### 10. **Reconnect Electrical Connectors**
– Reattach the electrical connectors to each injector, ensuring they click into place securely.
#### 11. **Reconnect Fuel Lines**
– Reconnect the fuel lines, making sure they are seated properly to avoid leaks. Tighten any fittings as needed.
#### 12. **Reinstall Engine Cover**
– If you removed any engine covers, reinstall them now.
#### 13. **Reconnect the Battery**
– Reconnect the battery and ensure all connections are secure.
#### 14. **Start the Engine**
– Start the engine and let it run for a few minutes. Check for any leaks around the fuel injectors and connections.
– If everything appears normal, you’ve successfully cleaned the fuel injectors!
### Final Tips:
– If you experience rough idling or performance issues after cleaning the injectors, double-check all connections and installation.
– Consider using a fuel additive periodically to help keep injectors clean in the future.
– Regular maintenance is key! Follow the manufacturer’s recommendations for fuel system maintenance to keep your backhoe running smoothly.
If you’re unsure or uncomfortable performing any of these steps, it’s always best to consult with or hire a professional mechanic. Good luck with your fuel injector cleaning!
A tire repair kit is an essential automotive accessory designed to provide a quick and effective solution for fixing flat tires. These kits are particularly valuable for drivers who want to avoid the inconvenience of being stranded due to a tire puncture or air loss. Typically, a tire repair kit includes a variety of tools and materials that facilitate the repair process.
One of the most common types of tire repair kits is the tubeless tire repair kit, which is specifically designed for cars with tubeless tires. These kits usually contain items such as tire plugs or patches, a reamer tool to clean and prepare the puncture, and a plug insertion tool to insert the rubber plug into the hole. Some kits may also include a canister of tire sealant, which can quickly seal small leaks and inflate the tire.
In addition to the basic repair components, many tire repair kits come with safety items such as gloves and instructions for use, making them user-friendly even for those with minimal automotive experience. Portable air compressors are also often included in more comprehensive kits, enabling drivers to reinflate the tire after repair.
Overall, a tire repair kit is a cost-effective and practical solution that empowers drivers to address tire issues promptly, ensuring safety on the road and reducing the need for professional assistance in minor tire emergencies.